NSDT工具推荐: Three.js AI纹理开发包 - YOLO合成数据生成器 - GLTF/GLB在线编辑 - 3D模型格式在线转换 - 可编程3D场景编辑器 - REVIT导出3D模型插件 - 3D模型语义搜索引擎 - AI模型在线查看 - Three.js虚拟轴心开发包 - 3D模型在线减面 - STL模型在线切割 - 3D道路快速建模
AI 图像生成器和故事创建器(AI Image Story Generator)是一款 Web 应用程序,它利用先进的 AI 技术为用户提供一个交互式平台,用于根据音频提示生成图像和故事。
该应用程序使用 FastAPI 作为后端,从而能够高效处理请求和响应,而前端则使用 HTML、CSS(DaisyUI 和 Tailwind CSS)和 JavaScript 构建,以实现响应式用户体验。
该应用程序分别利用 llama-3.1–70b 生成提示、black-forest-labs/flux-1.1-pro 生成图像以及 llava-v1.5–7b vbision 模型通过 Groq 和 Replicat.AI 创作故事。
主要功能:
- 录音和转录:用户可以录制自己的语音提示,然后使用语音识别技术将其转录为文本。
- 图像生成:根据转录的文本,应用程序生成详细的图像提示并使用 Replicate API 创建相应的图像。
- 图片下载:用户可以将生成的图片下载到本地设备。
- 故事生成:该应用程序可以根据创建的图像生成引人入胜的故事,为视觉内容提供叙事背景。
- 用户友好界面:该应用程序具有简洁直观的界面,方便用户与各种功能进行交互。
使用的技术:
- 后端:FastAPI、Groq、Replicate.ai、SpeechRecognition
- 前端:HTML、CSS(DaisyUI、Tailwind CSS)、JavaScript
- 图像处理:用于图像处理的 Pillow
- 异步操作:用于高效文件处理和网络请求的 aiohttp 和 aiofiles
该项目作为将多个 AI 服务集成到一个有凝聚力的应用程序中的示例,允许用户探索 AI 生成内容的创造性可能性
1、代码库说明
前端(HTML/JavaScript):
- 该应用程序使用单个 HTML 页面(index.html),并使用 DaisyUI 和 Tailwind CSS 进行响应式设计。
- 该页面包含用于录音、转录、提示生成、图像生成和故事生成的部分。
- JavaScript 文件(script.js)处理用户交互并与后端 API 通信。
后端(FastAPI):
主应用程序在 app/main.py 中定义。
它使用 FastAPI 创建具有各种端点的 Web 服务器:
/:提供主 HTML 页面。/transcribe:将音频转录为文本。/generate_prompt:使用 Groq 的 LLM 从文本生成图像提示。/generate_image:使用 Replicate 的 Flux 模型生成图像。/download_image:下载并保存生成的图像。/generate_story_from_image:使用 Groq 的 LLaVA 模型根据图像生成故事。/download/{filename}:提供下载的图像文件。
主要功能:
- 录音和转录
- 文本到图像提示生成
- 根据提示生成图像
- 根据图像生成故事
- 图像下载和保存
外部 API:
- Groq:用于文本生成(调整后的提示和故事)
- Replicate AI:用于图像生成的 black-forest-labs/flux-1.1-pro 模型
- 需要安装的软件包:
fastapi
uvicorn
jinja2
python-multipart
pydantic
python-dotenv
groq
replicate
SpeechRecognition
pydub
aiohttp
aiofiles
Pillow
可以使用pip安装上述包:
pip install fastapi uvicorn jinja2 python-multipart pydantic python-dotenv groq replicate SpeechRecognition pydub aiohttp aiofiles Pillow2、执行说明
设置环境变量:在根目录中创建一个 .env 文件,内容如下:
GROQ_API_KEY=your_groq_api_key_here
REPLICATE_API_TOKEN=your_replicate_api_token_here
将占位符值替换为你的实际 API 密钥。
确保已准备好所有必要的文件:
- app/main.py
- app/config.py
- app/utils.py
- templates/index.html
- static/css/styles.css
- static/js/script.js
- 运行 FastAPI 服务器:导航到包含 app/main.py 的目录并运行:
uvicorn app.main:app - reload打开 Web 浏览器并转到 http://127.0.0.1:8000 ,即可访问应用程序。
使用应用程序:
- 单击“开始录制”并说出提示。
- 完成后单击“停止录制”。
- 音频将自动转录。
- 单击“生成图像提示”以创建详细提示。
- 单击“生成图像”以根据提示创建图像。
- 使用“下载图像”按钮保存生成的图像。
- 单击“生成故事”以根据生成的图像创建故事。
注意:请确保具有正确的互联网连接,因为该应用程序依赖外部 API 来实现各种功能。
此应用程序演示了各种 AI 技术的复杂集成,包括语音识别、语言模型和图像生成,所有这些都包含在一个用户友好的 Web 界面中。
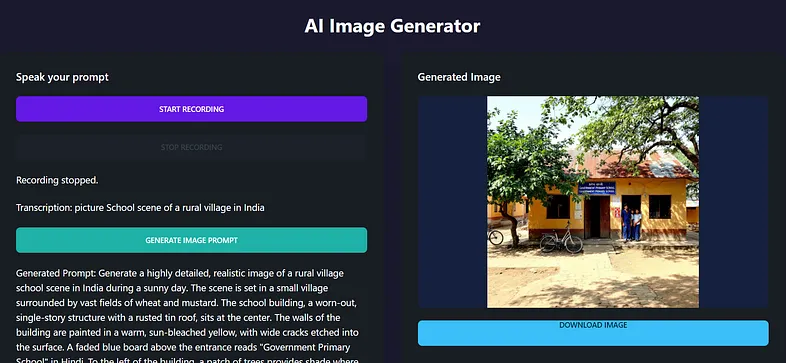
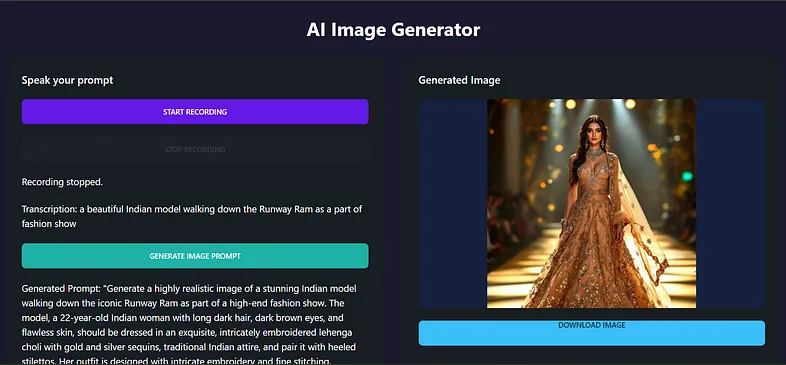
FastAPI UI 如下图所示


3、使用说明

说出你的提示,然后
- 开始录音
- 停止录音
- 转录(转录文本):一位美丽的印度模特走在 Runway Ram 上,这是时装秀的一部分
根据转录文本创建新的提示以生成图像
生成的提示:
“生成一个高度逼真的图像,展示一位惊艳的印度模特走在标志性的 Runway Ram 上,这是高端时装秀的一部分。这位模特是一位 22 岁的印度女性,有着长长的黑发、深棕色的眼睛和完美的皮肤,应该穿着一件精致的、绣有金色和银色亮片的 lehenga choli,这是传统的印度服装,并搭配高跟细跟鞋。她的服装采用复杂的刺绣和精细的缝线设计。强调优雅的褶皱、闪闪发光的面料以及她优雅的姿态和自信的步伐。在她的手、脖子和一侧的发型上融入精致的珠宝饰品,如珠子、金手镯和项链。灯光效果起着重要作用,设置暖色舞台灯,突出模特的服装,并用柔和的蓝色调照亮整个环境。相机角度应完全显示服装的细节。理想的场景视角是模特的正面全身镜头,位于中间,她周围的走秀被强烈的金色灯光照亮,从内部照亮。”
生成的图像:

由图像生成的故事:
这位选美皇后身着金色和银色亮片服装,搭配 lehenga 裙和闪亮耳环,令人惊艳,足以让任何观众着迷。Sashaya Gnanavel 在前景中引人注目,自信地走在跑道上,吸引着表演的观众。她时尚的服装搭配优雅的珍珠项链,吸引了在场每个人的注意。该系列展示了鲜艳的色彩和闪闪发光的刺绣,增加了活动的整体视觉吸引力。聚光灯下的 Sashaya 自信而美丽,充分体现了她的才华和对时尚界的奉献精神。她的妆容、珠宝和精致的服装营造出令人眼花缭乱的效果,为展示非凡的设计和工艺奠定了基础。这个引人入胜的场景充满了魔力和奢华,观众对这一切的纯粹精致感到惊叹不已。
4、代码实现
首先使用 Python 的 venv 模块创建虚拟环境,请按照以下步骤操作:
打开终端或命令提示符。
导航到项目目录(你要在其中创建虚拟环境)。可以使用 cd 命令更改目录。例如:
cd path/to/your/project通过运行以下命令创建虚拟环境:
python -m venv venv此命令会在你的项目文件夹中创建一个名为 venv 的新目录,该目录将包含虚拟环境(在 Windows 上)
激活虚拟环境:
venv\Scripts\activate文件夹结构:

utils.py:
import base64
import os
from pydub import AudioSegment

def save_audio(audio_data):
    # Decode the base64 audio data
    audio_bytes = base64.b64decode(audio_data.split(",")[1])

    # Save the audio to a temporary file
    temp_file = "temp_audio.webm"
    with open(temp_file, "wb") as f:
        f.write(audio_bytes)

    # Convert WebM to WAV
    audio = AudioSegment.from_file(temp_file, format="webm")
    wav_file = "temp_audio.wav"
    audio.export(wav_file, format="wav")

    # Remove the temporary WebM file
    os.remove(temp_file)

    return wav_file

def text_to_speech(text):
    # Implement text-to-speech functionality if needed
    pass
main.py:
"""
    1. Record audio through their microphone
    2. Transcribe the audio to text
    3. Generate an image prompt using the Groq Llama3 model
    4. Generate an image using the Replicate.ai Flux model
    5. Display the generated image
    6. Download the generated image
    The application uses DaisyUI and Tailwind CSS for styling, providing a dark mode interface. The layout is responsive and should work well on both desktop and mobile devices.
Note: You may need to adjust some parts of the code depending on the specific APIs and models you're using, as well as any security considerations for your deployment environment.

"""
from fastapi import FastAPI, Request, HTTPException
from fastapi.templating import Jinja2Templates
from fastapi.staticfiles import StaticFiles
from fastapi.responses import JSONResponse, FileResponse
from pydantic import BaseModel
import speech_recognition as sr
from groq import Groq
import replicate
import os
import aiohttp
import aiofiles
import time
from dotenv import load_dotenv
load_dotenv()
from .utils import text_to_speech, save_audio
from PIL import Image
import io
import base64
import base64


# Function to encode the image
def encode_image(image_path):
  with open(image_path, "rb") as image_file:
    return base64.b64encode(image_file.read()).decode('utf-8')

app = FastAPI()

app.mount("/static", StaticFiles(directory="static"), name="static")
templates = Jinja2Templates(directory="templates")

# Initialize Groq client with the API key
GROQ_API_KEY = os.getenv("GROQ_API_KEY")
if not GROQ_API_KEY:
    raise ValueError("GROQ_API_KEY is not set in the environment variables")
groq_client = Groq(api_key=GROQ_API_KEY)

class AudioData(BaseModel):
    audio_data: str

class ImagePrompt(BaseModel):
    prompt: str

class PromptRequest(BaseModel):
    text: str

# Add this new model
class FreeImagePrompt(BaseModel):
    prompt: str
    image_path: str

@app.get("/")
async def read_root(request: Request):
    return templates.TemplateResponse("index.html", {"request": request})

@app.post("/transcribe")
async def transcribe_audio(audio_data: AudioData):
    try:
        # Save the audio data to a file
        audio_file = save_audio(audio_data.audio_data)

        # Transcribe the audio
        recognizer = sr.Recognizer()
        with sr.AudioFile(audio_file) as source:
            audio = recognizer.record(source)
        text = recognizer.recognize_google(audio)

        return JSONResponse(content={"text": text})
    except Exception as e:
        raise HTTPException(status_code=400, detail=str(e))

@app.post("/generate_prompt")
async def generate_prompt(prompt_request: PromptRequest):
    try:
        text = prompt_request.text
        # Use Groq to generate a new prompt
        response = groq_client.chat.completions.create(
            messages=[
                {"role": "system", "content": "You are a creative assistant that generates prompts for realistic image generation."},
                {"role": "user", "content": f"Generate a detailed prompt for a realistic image based on this description: {text}.The prompt should be clear and detailed in no more than 200 words."}
            ],
            model="llama-3.1-70b-versatile",
            max_tokens=256
        )
        generated_prompt = response.choices[0].message.content
        print(f"tweaked prompt:{generated_prompt}")
        return JSONResponse(content={"prompt": generated_prompt})
    except Exception as e:
        print(f"Error generating prompt: {str(e)}")
        raise HTTPException(status_code=400, detail=str(e))

@app.post("/generate_image")
async def generate_image(image_prompt: ImagePrompt):
    try:
        prompt = image_prompt.prompt
        print(f"Received prompt: {prompt}")

        # Use Replicate to generate an image
        output = replicate.run(
            "black-forest-labs/flux-1.1-pro",
            input={
                "prompt": prompt,
                "aspect_ratio": "1:1",
                "output_format": "jpg",
                "output_quality": 80,
                "safety_tolerance": 2,
                "prompt_upsampling": True
            }
        )

        print(f"Raw output: {output}")
        print(f"Output type: {type(output)}")

        # Convert the FileOutput object to a string
        image_url = str(output)

        print(f"Generated image URL: {image_url}")

        return JSONResponse(content={"image_url": image_url})
    except Exception as e:
        print(f"Error generating image: {str(e)}")
        raise HTTPException(status_code=400, detail=str(e))

@app.get("/download_image")
async def download_image(image_url: str):
    try:
        # Create Output folder if it doesn't exist
        output_folder = "Output"
        os.makedirs(output_folder, exist_ok=True)

        # Generate a unique filename
        filename = f"generated_image_{int(time.time())}.jpg"
        filepath = os.path.join(output_folder, filename)

        # Download the image
        async with aiohttp.ClientSession() as session:
            async with session.get(image_url) as resp:
                if resp.status == 200:
                    async with aiofiles.open(filepath, mode='wb') as f:
                        await f.write(await resp.read())

        # Return the filepath and filename
        return JSONResponse(content={
            "filepath": filepath,
            "filename": filename
        })
    except Exception as e:
        print(f"Error downloading image: {str(e)}")
        raise HTTPException(status_code=400, detail=str(e))

class StoryRequest(BaseModel):
    filepath: str
    filename: str

@app.post("/generate_story_from_image")
async def generate_story_from_image(content: StoryRequest):
    try:
        image_path = content.filepath
        print(f"Image path: {image_path}")
        # Check if the file exists
        if not os.path.exists(image_path):
            raise HTTPException(status_code=400, detail="Image file not found")

        # Getting the base64 string
        base64_image = encode_image(image_path)

        client = Groq()

        chat_completion = client.chat.completions.create(
            messages=[
                {
                    "role": "user",
                    "content": [
                        {"type": "text", "text": "Generate a clear,concise,meaningful and engaging cover story for a highly acclaimed leisure magazine based on the image provided. The story should keep the audience glued and engaged and the story should bewithin 200 words."},
                        {
                            "type": "image_url",
                            "image_url": {
                                "url": f"data:image/jpeg;base64,{base64_image}",
                            },
                        },
                    ],
                }
            ],
            model="llava-v1.5-7b-4096-preview",
        )

        story = chat_completion.choices[0].message.content
        print(f"Generated story: {story}")
        return JSONResponse(content={"story": story})
    except Exception as e:
        print(f"Error generating story from the image: {str(e)}")
        raise HTTPException(status_code=400, detail=str(e))

@app.get("/download/{filename}")
async def serve_file(filename: str):
    file_path = os.path.join("Output", filename)
    return FileResponse(file_path, filename=filename)

if __name__ == "__main__":
    import uvicorn
    uvicorn.run(app, host="0.0.0.0", port=8000)
script.js
let mediaRecorder;
let audioChunks = [];

const startRecordingButton = document.getElementById('startRecording');
const stopRecordingButton = document.getElementById('stopRecording');
const recordingStatus = document.getElementById('recordingStatus');
const transcription = document.getElementById('transcription');
const generatePromptButton = document.getElementById('generatePrompt');
const generatedPrompt = document.getElementById('generatedPrompt');
const generateImageButton = document.getElementById('generateImage');
const generatedImage = document.getElementById('generatedImage');
const downloadLink = document.getElementById('downloadLink');
const generateStoryButton = document.getElementById('generateStory');
const generatedStory = document.getElementById('generatedStory');

startRecordingButton.addEventListener('click', startRecording);
stopRecordingButton.addEventListener('click', stopRecording);
generatePromptButton.addEventListener('click', generatePrompt);
generateImageButton.addEventListener('click', generateImage);
generateStoryButton.addEventListener('click', generateStory);

async function startRecording() {
    const stream = await navigator.mediaDevices.getUserMedia({ audio: true });
    mediaRecorder = new MediaRecorder(stream);

    mediaRecorder.ondataavailable = (event) => {
        audioChunks.push(event.data);
    };

    mediaRecorder.onstop = sendAudioToServer;

    mediaRecorder.start();
    startRecordingButton.disabled = true;
    stopRecordingButton.disabled = false;
    recordingStatus.textContent = 'Recording...';
}

function stopRecording() {
    mediaRecorder.stop();
    startRecordingButton.disabled = false;
    stopRecordingButton.disabled = true;
    recordingStatus.textContent = 'Recording stopped.';
}

async function sendAudioToServer() {
    const audioBlob = new Blob(audioChunks, { type: 'audio/webm' });
    const reader = new FileReader();
    reader.readAsDataURL(audioBlob);
    reader.onloadend = async () => {
        const base64Audio = reader.result;
        const response = await fetch('/transcribe', {
            method: 'POST',
            headers: {
                'Content-Type': 'application/json',
            },
            body: JSON.stringify({ audio_data: base64Audio }),
        });
        const data = await response.json();
        transcription.textContent = `Transcription: ${data.text}`;
        generatePromptButton.disabled = false;
    };
    audioChunks = [];
}

async function generatePrompt() {
    const text = transcription.textContent.replace('Transcription: ', '');
    const response = await fetch('/generate_prompt', {
        method: 'POST',
        headers: {
            'Content-Type': 'application/json',
        },
        body: JSON.stringify({ text: text }),
    });
    const data = await response.json();
    generatedPrompt.textContent = `Generated Prompt: ${data.prompt}`;
    generateImageButton.disabled = false;
}

async function generateImage() {
    const prompt = generatedPrompt.textContent.replace('Generated Prompt: ', '');
    const response = await fetch('/generate_image', {
        method: 'POST',
        headers: {
            'Content-Type': 'application/json',
        },
        body: JSON.stringify({ prompt: prompt }),
    });
    const data = await response.json();
    generatedImage.src = data.image_url;

    // Download the image and get the filepath
    const downloadResponse = await fetch(`/download_image?image_url=${encodeURIComponent(data.image_url)}`);
    const downloadData = await downloadResponse.json();

    // Store the filepath and filename for later use
    generatedImage.dataset.filepath = downloadData.filepath;
    generatedImage.dataset.filename = downloadData.filename;

    // Set up the download link
    downloadLink.href = `/download/${downloadData.filename}`;
    downloadLink.download = downloadData.filename;
    downloadLink.style.display = 'inline-block';
}

async function generateStory() {
    const imagePath = generatedImage.dataset.filepath;
    const filename = generatedImage.dataset.filename;

    if (!imagePath || !filename) {
        generatedStory.textContent = "Error: Please generate an image first.";
        return;
    }

    try {
        const response = await fetch('/generate_story_from_image', {
            method: 'POST',
            headers: {
                'Content-Type': 'application/json',
            },
            body: JSON.stringify({ filepath: imagePath, filename: filename }),
        });
        if (!response.ok) {
            throw new Error(`HTTP error! status: ${response.status}`);
        }
        const data = await response.json();

        // Display the generated story
        generatedStory.textContent = data.story;

        // Make sure the story container is visible
        document.getElementById('storyContainer').style.display = 'block';
    } catch (error) {
        console.error('Error:', error);
        generatedStory.textContent = `Error: ${error.message}`;
    }
}

// Modify the download link click event
downloadLink.addEventListener('click', async (event) => {
    event.preventDefault();
    const response = await fetch(downloadLink.href);
    const blob = await response.blob();
    const url = window.URL.createObjectURL(blob);
    const a = document.createElement('a');
    a.style.display = 'none';
    a.href = url;
    a.download = response.headers.get('Content-Disposition').split('filename=')[1];
    document.body.appendChild(a);
    a.click();
    window.URL.revokeObjectURL(url);
});
style.css
body {
    background-color: #1a1a2e;
    color: #ffffff;
}

.container {
    max-width: 1200px;
}

#imageContainer {
    min-height: 300px;
    display: flex;
    align-items: center;
    justify-content: center;
    background-color: #16213e;
    border-radius: 8px;
}

#generatedImage {
    max-width: 100%;
    max-height: 400px;
    object-fit: contain;
}
index.html
<!DOCTYPE html>
<html lang="en" data-theme="dark">
<head>
    <meta charset="UTF-8">
    <meta name="viewport" content="width=device-width, initial-scale=1.0">
    <title>AI Image Generator</title>
    <link href="https://cdn.jsdelivr.net/npm/daisyui@3.7.3/dist/full.css" rel="stylesheet" type="text/css" />
    <script src="https://cdn.tailwindcss.com"></script>
    <link rel="stylesheet" href="{{ url_for('static', path='/css/styles.css') }}">
</head>
<body>
    <div class="container mx-auto px-4 py-8">
        <h1 class="text-4xl font-bold mb-8 text-center">AI Image Generator</h1>
        <div class="grid grid-cols-1 md:grid-cols-2 gap-8">
            <div class="card bg-base-200 shadow-xl">
                <div class="card-body">
                    <h2 class="card-title mb-4">Speak your prompt</h2>
                    <button id="startRecording" class="btn btn-primary mb-4">Start Recording</button>
                    <button id="stopRecording" class="btn btn-secondary mb-4" disabled>Stop Recording</button>
                    <div id="recordingStatus" class="text-lg mb-4"></div>
                    <div id="transcription" class="text-lg mb-4"></div>
                    <button id="generatePrompt" class="btn btn-accent mb-4" disabled>Generate Image Prompt</button>
                    <div id="generatedPrompt" class="text-lg mb-4"></div>
                    <button id="generateImage" class="btn btn-success" disabled>Generate Image</button>
                </div>
            </div>
            <div class="card bg-base-200 shadow-xl">
                <div class="card-body">
                    <h2 class="card-title mb-4">Generated Image</h2>
                    <div id="imageContainer" class="mb-4">
                        <img id="generatedImage" src="" alt="Generated Image" class="w-full h-auto">
                    </div>
                    <a id="downloadLink" href="#" download="generated_image.png" class="btn btn-info" style="display: none;">Download Image</a>
                </div>
            </div>
        </div>
        <!-- Add this new section after the existing cards -->
        <div class="card bg-base-200 shadow-xl mt-8">
            <div class="card-body">
                <h2 class="card-title mb-4">Generate Story from Image</h2>
                <button id="generateStory" class="btn btn-primary mb-4">Generate Story</button>
                <div id="storyContainer" class="mb-4">
                    <p id="generatedStory" class="text-lg"></p>
                </div>
            </div>
        </div>
    </div>
    <script src="{{ url_for('static', path='/js/script.js') }}"></script>
</body>
</html>
5、结束语
AI 图像生成器和故事创建器项目成功集成了各种 AI 技术,创建了一个交互式 Web 应用程序,允许用户根据音频提示生成图像和故事。通过利用后端的 FastAPI 和现代前端技术,该应用程序提供了无缝的用户体验。
原文链接:AI Image Generator and Story Generation App using FastAPI, Groq and Replicate
BimAnt翻译整理,转载请标明出处


