NSDT工具推荐: Three.js AI纹理开发包 - YOLO合成数据生成器 - GLTF/GLB在线编辑 - 3D模型格式在线转换 - 可编程3D场景编辑器 - REVIT导出3D模型插件 - 3D模型语义搜索引擎 - Three.js虚拟轴心开发包 - 3D模型在线减面 - STL模型在线切割
就在不久前,创建和部署游戏的唯一方法是选择像 Unity 或 Unreal 这样的游戏引擎,学习语言,然后打包游戏并将其部署到你选择的平台上。
试图通过浏览器向用户提供游戏的想法似乎是一项不可能完成的任务。
幸运的是,由于浏览器技术的进步和硬件加速在所有流行的浏览器中都可用,JavaScript 性能的改进以及可用处理能力的稳步提高,为浏览器创建交互式游戏体验变得越来越普遍。
在本文中,我们将了解如何使用 Three.js 创建游戏。但首先,让我们回顾一下 Three.js 是什么以及为什么它是游戏开发的好选择。
1、Three.js是什么?
Three.js 在 GitHub 上的项目描述恰当地将 Three.js 描述为“......一个易于使用、轻量级、跨浏览器的通用 3D 库”。
Three.js 让我们作为开发人员可以相对简单地在屏幕上绘制 3D 对象和模型。如果没有它,我们将需要直接与 WebGL 交互,虽然这并非不可能,但即使是最小的游戏开发项目也会花费大量时间。
传统上,“游戏引擎”由多个部分组成。例如,Unity 和 Unreal 提供了一种将对象渲染到屏幕上的方法,但也提供了大量其他功能,如网络、物理等等。
然而,Three.js 的方法更受限制,不包括物理或网络之类的东西。但是,这种更简单的方法意味着它更容易学习和更优化以做它最擅长的事情:将对象绘制到屏幕上。
它还有一组很棒的示例,我们可以使用它们来了解如何在屏幕上绘制各种对象。最后,它提供了一种简单且原生的方式将我们的模型加载到我们的场景中。
如果不希望用户需要通过应用商店下载应用或进行任何设置来玩你的游戏,那么Three.js 作为游戏开发引擎可能是一个有吸引力的选择。如果你的游戏在浏览器中运行,那么进入门槛最低,这只能是一件好事。
2、使用 Three.js 创建游戏
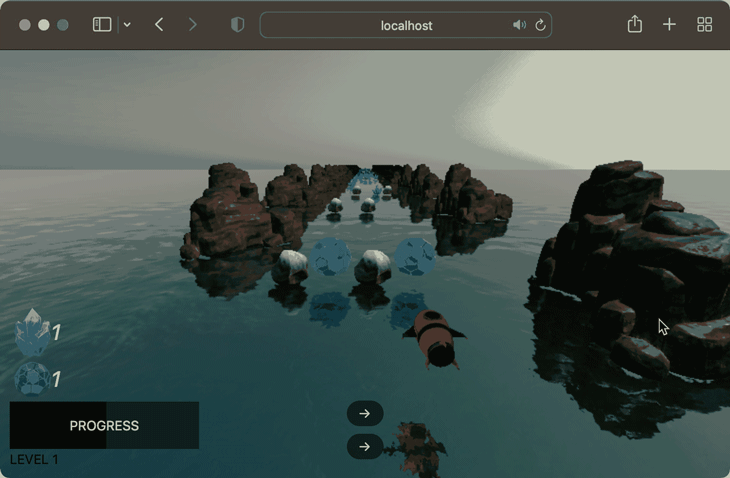
今天,我们将通过制作一个使用着色器、模型、动画和游戏逻辑的游戏来浏览 Three.js。我们将创建的内容如下所示:
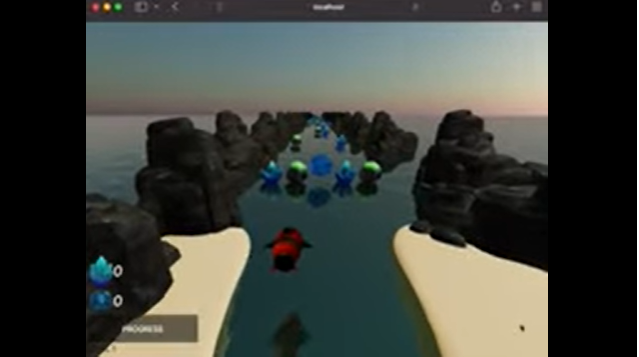
这个概念很简单。我们控制着一艘火箭飞船,穿越一个星球,我们的目标是拾取能量晶体。我们还需要通过增加护盾来管理飞船的健康状况,并尽量不要因为撞击场景中的岩石而严重损坏我们的船。
在我们的运行结束时,火箭飞船返回天空中的母舰,如果用户点击NEXT LEVEL,他们会再次尝试,这一次火箭要经过更长的路径。
随着用户玩游戏,火箭飞船的速度会增加,因此他们必须更快地躲避岩石并收集能量晶体。
要创建这样的游戏,我们必须回答以下问题:
- 我们怎样才能让一艘火箭飞船在一片汪洋大海上永远向前移动?
- 我们如何检测火箭飞船与物体之间的碰撞?
- 我们如何创建一个在桌面和移动设备上都可以使用的 UI?
到我们制作这款游戏时,我们将克服这些挑战。
不过,在我们开始编码之前,我们必须回顾一些简短的理论,特别是与我们将如何在游戏中创造运动感有关。
2、创造运动感
想象一下,你在现实生活中控制着一架直升机,并且正在跟踪地面上的一个物体。物体以逐渐增加的速度继续前进。为了跟上,你必须逐渐提高你所在直升机的速度。
如果对直升机或地面上的物体的速度没有限制,只要你想跟上地面上的物体,这种情况就会持续下去。
当创建一个跟随对象的游戏时,正如我们在本例中所做的那样,应用相同的逻辑可能很诱人。也就是说,在世界空间中随着物体的加速移动物体,并更新后面跟随的相机的速度。然而,这提出了一个直接的问题。
基本上,每个玩这个游戏的人都会在他们的手机或台式电脑上玩它。这些设备资源有限。如果我们尝试在相机移动时生成可能无限数量的对象,然后移动该相机,最终我们将耗尽所有可用资源,并且浏览器选项卡将变得无响应或崩溃。
我们还需要创建一个代表海洋的平面(一个平面 2D 对象)。当我们这样做时,我们必须给出海洋的尺寸。
然而,我们不能创建一个无限大的平面,我们也不能创建一个巨大的平面,只是希望用户永远不会在我们的关卡中前进到足以让他们离开平面的程度。
那是糟糕的设计,并且希望人们玩我们的游戏不足以体验错误似乎违反直觉。
3、有限范围内的无限运动
我们不是在一个方向上无限期地移动我们的相机,而是让相机保持静止并移动它周围的环境。这有几个好处。
一是我们总是知道火箭飞船在哪里,因为火箭的位置不会移到远处;它只会左右移动。这让我们很容易判断物体是否在相机后面,并且可以从场景中移除以释放资源。
另一个好处是我们可以选择远处的一个点来创建对象。这意味着当物体接近玩家时,新的物品或物体将不断地在玩家视野之外的距离创建。
当它们从视野中消失时,无论是玩家与它们发生碰撞还是从玩家身后消失,这些物品都会从场景中移除,以降低内存使用量。
要创建这种效果,我们需要做两件事:首先,我们需要在程序上沿深度轴移动每个项目,以将对象移向相机。其次,我们必须为我们的水面提供一个可以抵消的值,并随着时间的推移增加这个偏移量。
这将产生水面移动越来越快的效果。
现在我们已经解决了如何在场景中向前移动火箭,让我们继续设置我们的项目。
4、游戏项目配置
让我们开始制作游戏吧!我们需要做的第一件事是设置构建环境。对于这个例子,我选择使用 Typescript 和 Webpack。这篇文章不是要讨论这些技术的有点,所以除了快速总结之外,我不会在这里详细介绍它们。
使用 Webpack 意味着当我们开发项目并保存文件时,Webpack 将看到我们的文件已更改,并使用保存的更改自动重新加载浏览器。
这意味着我们无需在每次进行更改时手动刷新浏览器,从而节省大量时间。这也意味着我们可以使用像three-minifier这样的插件,它可以在我们部署它时减小我们的包的大小。
在我们的示例中使用 TypeScript 意味着我们的项目将具有类型安全性。我发现这在使用 Three.js 的一些内部类型时特别有用,比如Vector3s 和Quaternions. 知道我将正确类型的值分配给变量是非常有价值的。
我们还将在 UI 中使用Materialize CSS。对于我们将用作 UI 的几个按钮和卡片,这个 CSS 框架将有很大帮助。
要开始我们的项目,请创建一个新文件夹。在文件夹中,创建一个package.json并粘贴以下内容:
{
  "dependencies": {
    "materialize-css": "^1.0.0",
    "nipplejs": "^0.9.0",
    "three": "^0.135.0"
  },
  "devDependencies": {
    "@types/three": "^0.135.0",
    "@yushijinhun/three-minifier-webpack": "^0.3.0",
    "clean-webpack-plugin": "^4.0.0",
    "copy-webpack-plugin": "^9.1.0",
    "html-webpack-plugin": "^5.5.0",
    "raw-loader": "^4.0.2",
    "ts-loader": "^9.2.5",
    "typescript": "^4.5.4",
    "webpack": "^5.51.1",
    "webpack-cli": "^4.8.0",
    "webpack-dev-server": "^4.0.0",
    "webpack-glsl-loader": "git+https://github.com/grieve/webpack-glsl-loader.git",
    "webpack-merge": "^5.8.0"
  },
  "scripts": {
    "dev": "webpack serve --config ./webpack.dev.js",
    "build": "webpack --config ./webpack.production.js"
  }
}然后,在命令窗口中,键入npm i以将包安装到新项目中。
5、添加 Webpack 文件
我们现在需要创建三个文件,一个基本的 Webpack 配置文件,然后是我们项目的开发和生产配置文件。
在项目文件夹中创建一个webpack.common.js文件并粘贴以下配置:
const HtmlWebpackPlugin = require("html-webpack-plugin");
const CopyPlugin = require("copy-webpack-plugin");

module.exports = {
    plugins: [
        // Automatically creat an index.html with the right bundle name and references to our javascript.
        new HtmlWebpackPlugin({
            template: 'html/index.html'
        }),
        // Copy game assets from our static directory, to the webpack output
        new CopyPlugin({
            patterns: [
                {from: 'static', to: 'static'}
            ]
        }),
    ],
    // Entrypoint for our game
    entry: './game.ts',
    module: {
        rules: [
            {
                // Load our GLSL shaders in as text
                test: /.(glsl|vs|fs|vert|frag)$/, exclude: /node_modules/, use: ['raw-loader']
            },
            {
                // Process our typescript and use ts-loader to transpile it to Javascript
                test: /.tsx?$/,
                use: 'ts-loader',
                exclude: /node_modules/,
            }

        ],
    },
    resolve: {
        extensions: ['.tsx', '.ts', '.js'],
    },

}然后,创建一个webpack.dev.js文件并粘贴这些详细信息。这配置了 Webpack 开发服务器的热重载功能:
const { merge } = require('webpack-merge')
const common = require('./webpack.common.js')
const path = require('path');
module.exports = merge(common, {
    mode: 'development', // Don't minify the source
    devtool: 'eval-source-map', // Source map for easier development
    devServer: {
        static: {
            directory: path.join(__dirname, './dist'), // Serve static files from here
        },
        hot: true, // Reload our page when the code changes
    },
})最后,创建一个webpack.production.js文件并粘贴这些详细信息:
const { merge } = require('webpack-merge')
const common = require('./webpack.common.js')
const path = require('path');
const ThreeMinifierPlugin = require("@yushijinhun/three-minifier-webpack");
const {CleanWebpackPlugin} = require("clean-webpack-plugin");
const threeMinifier = new ThreeMinifierPlugin();

module.exports = merge(common, {
    plugins: [
        threeMinifier, // Minifies our three.js code
        new CleanWebpackPlugin() // Cleans our 'dist' folder between builds
    ],
    resolve: {
        plugins: [
            threeMinifier.resolver,
        ]
    },
    mode: 'production', // Minify our output
    output: {
        path: path.resolve(__dirname, 'dist'),
        filename: '[name].[fullhash:8].js', // Our output will have a unique hash, which will force our clients to download updates if they become available later
        sourceMapFilename: '[name].[fullhash:8].map',
        chunkFilename: '[id].[fullhash:8].js'
    },
    optimization: {
        splitChunks: {
            chunks: 'all', // Split our code into smaller chunks to assist caching for our clients
        },
    },
})
6、配置 TypeScript 环境
我们需要做的下一件事是配置 TypeScript 环境以允许我们使用来自 JavaScript 文件的导入。为此,请创建一个tsconfig.json文件并粘贴以下详细信息:
{
    "compilerOptions": {
        "moduleResolution": "node",
        "strict": true,
        "allowJs": true,
        "checkJs": false,
        "target": "es2017",
      "module": "commonjs"

    },
    "include": ["**/*.ts"]
}
我们的构建环境现在已经配置好了。现在是时候开始为我们的玩家创造一个美丽而可信的场景了。
7、设置游戏场景
我们的场景包含以下元素:
- 场景本身(这是我们添加对象的地方,以构成游戏世界)
- 天空
- 水
- 背景对象(位于用户游戏区两侧的岩石)
- 火箭飞船
- 包含水晶、岩石和盾牌物品的排列(称为“挑战排列”)
我们将在一个名为 game.ts的文件中完成大部分工作,但我们也会将部分游戏拆分为单独的文件,这样我们就不会得到一个非常长的文件。我们现在可以继续创建文件game.ts。
因为我们正在处理一个非常复杂的主题,所以我还将包含指向此代码在 GitHub 上的项目中的位置的链接。这应该有望帮助你保持自己的方向,而不是在更大的项目中迷失方向。
8、创建Scene
我们需要做的第一件事是创建一个Scene,以便 Three.js 有一些东西可以渲染。在我们的game.ts中,我们将添加以下行来构建我们的并将 一个ScenePerspectiveCamera放置在场景中,这样我们就可以看到发生了什么。
最后,我们将为稍后分配的渲染器创建一个引用:
export const scene = new Scene()
export const camera = new PerspectiveCamera(
    75,
    window.innerWidth / window.innerHeight,
    0.1,
    2000
)

// Our three renderer
let renderer: WebGLRenderer;
9、创建初始化函数
为了设置我们的场景,我们需要执行一些任务,比如创建一个新的WebGLRenderer和设置我们想要绘制的画布的大小。
为此,让我们创建一个init函数并将其也放入我们的game.ts中。此init函数将为我们的场景执行初始设置,并且只运行一次(当游戏首次加载时):
/// Can be viewed here
async function init() {
    renderer = new WebGLRenderer();
    renderer.setSize(window.innerWidth, window.innerHeight);
    document.body.appendChild(renderer.domElement);
}
我们还需要为场景利用渲染和动画循环。我们需要动画循环来根据需要在屏幕上移动对象,并且我们需要渲染循环来将新帧绘制到屏幕上。
让我们继续在game.ts中创建render函数。 一开始,这个函数看起来很简单,因为它只是请求一个动画帧然后渲染场景。
我们请求动画帧的原因有很多,但其中一个主要原因是如果用户更改选项卡,我们的游戏将暂停,这将提高性能并减少设备上可能浪费的资源:
// Can be viewed here
const animate = () => {
    requestAnimationFrame(animate);
    renderer.render(scene, camera);
}
好了,现在我们有了一个空的场景,里面有一个相机,但没有别的了。让我们在场景中添加一些水。
10、在场景中创建水体
幸运的是,Three.js 包含一个我们可以在场景中使用的水对象示例。它包括实时反射,看起来相当不错;你可以在这里查看。
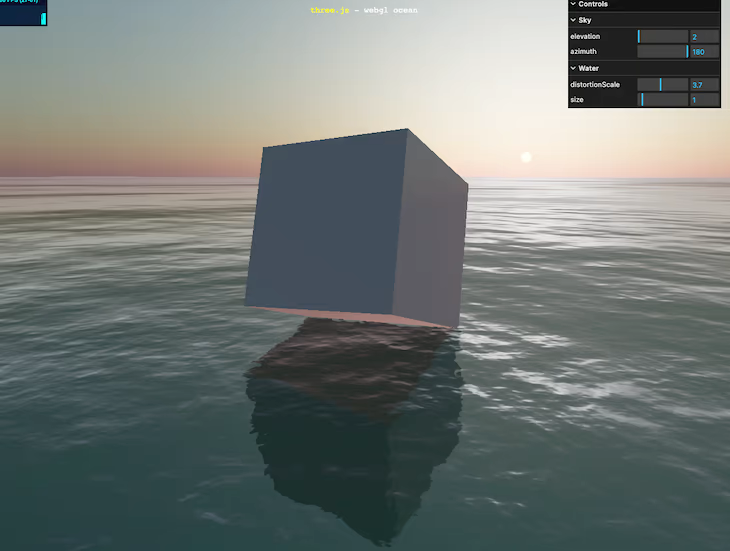
对我们来说幸运的是,这种水将完成我们在场景中想要做的大部分事情。我们唯一需要做的就是稍微改变水的着色器,这样我们就可以在渲染循环中更新它。
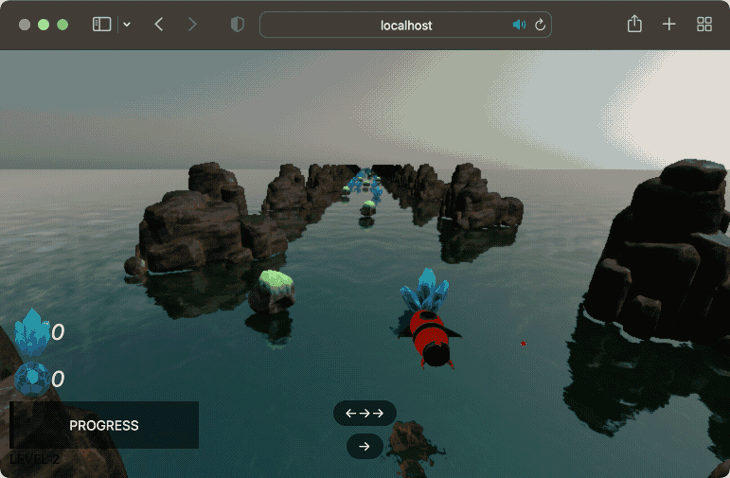
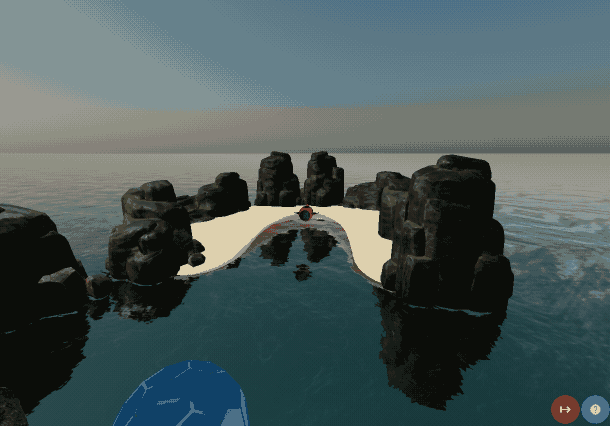
我们这样做是因为如果随着时间的推移,我们越来越多地抵消我们的水纹理,那么它会给我们带来速度的感觉。
作为演示,下面就是我们游戏的开场场景,但我每帧都增加了偏移量。随着偏移量的增加,感觉就像我们下方海洋的速度正在增加(即使火箭实际上是静止的)。

水对象可以在 Three.js GitHub 上找到。我们唯一需要做的就是做一个小的改变,使这个偏移量可以从我们的渲染循环中控制(所以我们可以随着时间的推移更新它)。
我们要做的第一件事是在 Three.js 存储库中获取 Water.js 示例的副本。我们将把这个文件objects/water.js放在我们的项目中。如果我们打开water.js文件,大约一半,我们将开始看到如下所示的内容:
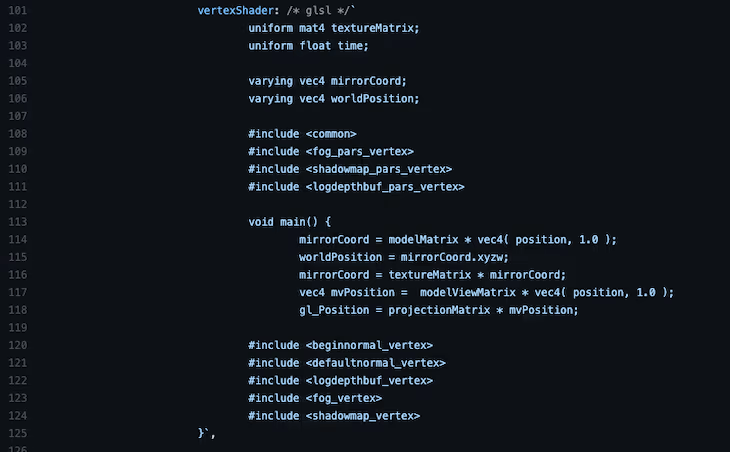
这是海洋材质的着色器。着色器本身的介绍超出了本文的范围,但基本上,它们是我们的游戏将向用户的计算机提供的关于如何绘制此特定对象的说明。
这里还有我们的着色器代码,它是用 OpenGraph 着色器语言 (GLSL) 编写的,并合并到一个原本是 JavaScript 的文件中。
这没有什么问题,但是如果我们将这个着色器代码单独移动到一个文件中,那么我们可以将 GLSL 支持安装到我们选择的 IDE 中,我们将获得语法着色和验证之类的东西,这有助于我们自定义 GLSL .
要将 GLSL 分解为单独的文件,让我们在当前objects目录中创建一个shader目录,选择 我们的vertexShader和 fragmentShader 的内容, 并将它们分别移动到waterFragmentShader.glsl和waterVertexShader.glsl文件中。
在我们waterFragmentShader.glsl文件的顶部,我们有一个getNoise函数。默认情况下,它看起来像这样:
vec4 getNoise( vec2 uv ) {
  vec2 uv0 = ( uv / 103.0 ) + vec2(time / 17.0, time / 29.0);
  vec2 uv1 = uv / 107.0-vec2( time / -19.0, time / 31.0 );
  vec2 uv2 = uv / vec2( 8907.0, 9803.0 ) + vec2( time / 101.0, time / 97.0 );
  vec2 uv3 = uv / vec2( 1091.0, 1027.0 ) - vec2( time / 109.0, time / -113.0 );
  vec4 noise = texture2D( normalSampler, uv0 ) +
   texture2D( normalSampler, uv1 ) +
   texture2D( normalSampler, uv2 ) +
   texture2D( normalSampler, uv3 );
  return noise * 0.5 - 1.0;
}
为了使这个偏移量可以从我们的游戏代码中调整,我们想在我们的 GLSL 文件中添加一个参数,允许我们在执行期间对其进行修改。为此,我们必须将此函数替换为以下函数:
// Can be viewed here

uniform float speed;

vec4 getNoise(vec2 uv) {
    float offset;
    if (speed == 0.0){
        offset = time / 10.0;
    }
    else {
        offset = speed;
    }
    vec2 uv3 = uv / vec2(50.0, 50.0) - vec2(speed / 1000.0, offset);
    vec2 uv0 = vec2(0, 0);
    vec2 uv1 = vec2(0, 0);
    vec2 uv2 = vec2(0, 0);
    vec4 noise = texture2D(normalSampler, uv0) +
    texture2D(normalSampler, uv1) +
    texture2D(normalSampler, uv2) +
    texture2D(normalSampler, uv3);
    return noise * 0.5 - 1.0;
}
你会注意到我们在这个 GLSL 文件中包含了一个新变量:speed变量。这是我们将更新以提供速度感的变量。
在我们的game.ts中,现在需要配置水的设置。在我们文件的顶部,添加以下变量:
// Can be viewed here

const waterGeometry = new PlaneGeometry(10000, 10000);

const water = new Water(
    waterGeometry,
    {
        textureWidth: 512,
        textureHeight: 512,
        waterNormals: new TextureLoader().load('static/normals/waternormals.jpeg', function (texture) {
            texture.wrapS = texture.wrapT = MirroredRepeatWrapping;
        }),
        sunDirection: new Vector3(),
        sunColor: 0xffffff,
        waterColor: 0x001e0f,
        distortionScale: 3.7,
        fog: scene.fog !== undefined
    }
);然后,在我们的init函数中,必须配置水平面的旋转和位置,如下所示:
// Can be viewed here
// Water
water.rotation.x = -Math.PI / 2;
water.rotation.z = 0;
scene.add(water);
这将为海洋提供正确的旋转。
11、为场景创建天空
Three.js 带有一个相当令人信服的天空,我们可以在项目中免费使用它。你可以在此处的 Three.js 示例页面中查看此示例。
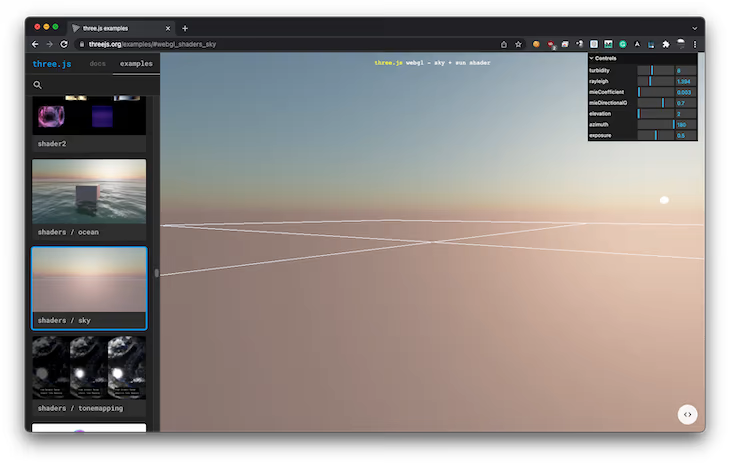
在我们的项目中添加天空非常容易;只需要将天空添加到场景中,设置天空盒的大小,然后设置一些参数来控制天空的外观。
在我们声明的init函数中,我们将天空添加到场景中并配置天空的视觉效果:
// Can be viewed here
const sky = new Sky();
sky.scale.setScalar(10000); // Specify the dimensions of the skybox
scene.add(sky); // Add the sky to our scene

// Set up variables to control the look of the sky
const skyUniforms = sky.material.uniforms;
skyUniforms['turbidity'].value = 10;
skyUniforms['rayleigh'].value = 2;
skyUniforms['mieCoefficient'].value = 0.005;
skyUniforms['mieDirectionalG'].value = 0.8;

const parameters = {
    elevation: 3,
    azimuth: 115
};

const pmremGenerator = new PMREMGenerator(renderer);

const phi = MathUtils.degToRad(90 - parameters.elevation);
const theta = MathUtils.degToRad(parameters.azimuth);

sun.setFromSphericalCoords(1, phi, theta);

sky.material.uniforms['sunPosition'].value.copy(sun);
(water.material as ShaderMaterial).uniforms['sunDirection'].value.copy(sun).normalize();
scene.environment = pmremGenerator.fromScene(sky as any).texture;

(water.material as ShaderMaterial).uniforms['speed'].value = 0.0;
12、最后的场景准备
我们需要对初始场景初始化做的最后一件事是添加一些光照并添加我们的火箭模型和母舰模型:
// Can be viewed here
// Set the appropriate scale for our rocket
rocketModel.scale.set(0.3, 0.3, 0.3);
scene.add(rocketModel);
scene.add(mothershipModel);

// Set the scale and location for our mothership (above the player)
mothershipModel.position.y = 200;
mothershipModel.position.z = 100;
mothershipModel.scale.set(15,15,15);
sceneConfiguration.ready = true;
现在我们有了一些漂亮的水和火箭的场景。但是,我们缺乏任何可以真正使它成为游戏的东西。为了解决这个问题,我们需要构建一些基本参数来控制游戏并允许玩家朝着某些目标前进。
在我们game.ts文件的顶部,我们将添加以下sceneConfiguration变量,这有助于我们跟踪场景中的对象:
// Can be viewed here
export const sceneConfiguration = {
    /// Whether the scene is ready (i.e.: All models have been loaded and can be used)
    ready: false,
    /// Whether the camera is moving from the beginning circular pattern to behind the ship
    cameraMovingToStartPosition: false,
    /// Whether the rocket is moving forward
    rocketMoving: false,
    // backgroundMoving: false,
    /// Collected game data
    data: {
        /// How many crystals the player has collected on this run
        crystalsCollected: 0,
        /// How many shields the player has collected on this run (can be as low as -5 if player hits rocks)
        shieldsCollected: 0,
    },
    /// The length of the current level, increases as levels go up
    courseLength: 500,
    /// How far the player is through the current level, initialises to zero.
    courseProgress: 0,
    /// Whether the level has finished
    levelOver: false,
    /// The current level, initialises to one.
    level: 1,
    /// Gives the completion amount of the course thus far, from 0.0 to 1.0.
    coursePercentComplete: () => (sceneConfiguration.courseProgress / sceneConfiguration.courseLength),
    /// Whether the start animation is playing (the circular camera movement while looking at the ship)
    cameraStartAnimationPlaying: false,
    /// How many 'background bits' are in the scene (the cliffs)
    backgroundBitCount: 0,
    /// How many 'challenge rows' are in the scene (the rows that have rocks, shields, or crystals in them).
    challengeRowCount: 0,
    /// The current speed of the ship
    speed: 0.0
}
现在,我们必须为玩家所在的当前关卡执行初始化。这个场景设置函数很重要,因为每次用户开始一个新的关卡时都会调用它。
因此,我们需要将火箭的位置设置回起点并清理所有正在使用的旧资产。我在代码行内添加了一些注释,以便你可以看到每一行在做什么:
// Can be viewed here
export const sceneSetup = (level: number) => {
    // Remove all references to old "challenge rows" and background bits
    sceneConfiguration.challengeRowCount = 0;
    sceneConfiguration.backgroundBitCount = 0;

    // Reset the camera position back to slightly infront of the ship, for the start-up animation
    camera.position.z = 50;
    camera.position.y = 12;
    camera.position.x = 15;
    camera.rotation.y = 2.5;

    // Add the starter bay to the scene (the sandy shore with the rocks around it)
    scene.add(starterBay);

    // Set the starter bay position to be close to the ship
    starterBay.position.copy(new Vector3(10, 0, 120));

    // Rotate the rocket model back to the correct orientation to play the level
    rocketModel.rotation.x = Math.PI;
    rocketModel.rotation.z = Math.PI;

    // Set the location of the rocket model to be within the starter bay
    rocketModel.position.z = 70;
    rocketModel.position.y = 10;
    rocketModel.position.x = 0;

    // Remove any existing challenge rows from the scene
    challengeRows.forEach(x => {
        scene.remove(x.rowParent);
    });

    // Remove any existing environment bits from the scene
    environmentBits.forEach(x => {
        scene.remove(x);
    })

    // Setting the length of these arrays to zero clears the array of any values
    environmentBits.length = 0;
    challengeRows.length = 0;

    // Render some challenge rows and background bits into the distance
    for (let i = 0; i < 60; i++) {
        // debugger;
        addChallengeRow(sceneConfiguration.challengeRowCount++);
        addBackgroundBit(sceneConfiguration.backgroundBitCount++);
    }

    //Set the variables back to their beginning state

    // Indicates that the animation where the camera flies from the current position isn't playing
    sceneConfiguration.cameraStartAnimationPlaying = false;
    // The level isn't over (we just started it)
    sceneConfiguration.levelOver = false;
    // The rocket isn't flying away back to the mothership
    rocketModel.userData.flyingAway = false;
    // Resets the current progress of the course to 0, as we haven't yet started the level we're on
    sceneConfiguration.courseProgress = 0;
    // Sets the length of the course based on our current level
    sceneConfiguration.courseLength = 1000 * level;

    // Reset how many things we've collected in this level to zero
    sceneConfiguration.data.shieldsCollected = 0;
    sceneConfiguration.data.crystalsCollected = 0;

    // Updates the UI to show how many things we've collected to zero.
    crystalUiElement.innerText = String(sceneConfiguration.data.crystalsCollected);
    shieldUiElement.innerText = String(sceneConfiguration.data.shieldsCollected);

    // Sets the current level ID in the UI
    document.getElementById('levelIndicator')!.innerText = `LEVEL ${sceneConfiguration.level}`;
    // Indicates that the scene setup has completed, and the scene is now ready
    sceneConfiguration.ready = true;
}
13、添加游戏逻辑
我们预计有两种类型的设备可以玩我们的游戏:台式电脑和手机。为此,我们需要适应两种类型的输入选项:
- 键盘(即键盘上的左右键)
- 触摸屏(通过在屏幕上显示操纵杆来从左到右操纵飞行器)
现在让我们配置这些。
14、键盘输入
在我们game.ts的开始,我们将添加以下变量来跟踪键盘上是否按下了左键或右键:
let leftPressed = false;
let rightPressed = false;然后,在我们的init函数中,我们将注册keydownandkeyup事件来分别调用onKeyDownandonKeyUp函数:
document.addEventListener('keydown', onKeyDown, false);
document.addEventListener('keyup', onKeyUp, false);
最后,对于键盘输入,我们将记录按下这些键时要执行的操作:
// Can be viewed here
function onKeyDown(event: KeyboardEvent) {
    console.log('keypress');
    let keyCode = event.which;
    if (keyCode == 37) { // Left arrow key
        leftPressed = true;
    } else if (keyCode == 39) { // Right arrow key
        rightPressed = true;
    }
}

function onKeyUp(event: KeyboardEvent) {
    let keyCode = event.which;
    if (keyCode == 37) { // Left arrow key
        leftPressed = false;
    } else if (keyCode == 39) { // Right arrow key
        rightPressed = false;
    }
}
15、触摸屏输入
我们的移动用户没有键盘可以输入,因此,我们将使用nippleJS在屏幕上创建一个操纵杆,并使用操纵杆的输出来影响火箭在屏幕上的位置。
在我们的init函数中,我们将通过检查它在屏幕上是否有非零数量的触摸点来检查设备是否是触摸设备。如果是,我们将创建操纵杆,但一旦玩家释放操纵杆的控制,我们还将将火箭的运动设置回零:
// Can be viewed here
if (isTouchDevice()) {
    // Get the area within the UI to use as our joystick
    let touchZone = document.getElementById('joystick-zone');

    if (touchZone != null) {
        // Create a Joystick Manager
        joystickManager = joystick.create({zone: document.getElementById('joystick-zone')!,})
        // Register what to do when the joystick moves
        joystickManager.on("move", (event, data) => {
            positionOffset = data.vector.x;
        })
        // When the joystick isn't being interacted with anymore, stop moving the rocket
        joystickManager.on('end', (event, data) => {
            positionOffset = 0.0;
        })
    }
}在我们的animate函数中,我们会跟踪此时按下左键或右键或操纵杆是否正在使用中的操作。我们还将火箭的位置夹在可接受的左右位置,这样火箭就不能完全移出屏幕:
// Can be viewed here
// If the left arrow is pressed, move the rocket to the left
if (leftPressed) {
    rocketModel.position.x -= 0.5;
}
// If the right arrow is pressed, move the rocket to the right
if (rightPressed) {
    rocketModel.position.x += 0.5;
}
// If the joystick is in use, update the current location of the rocket accordingly
rocketModel.position.x += positionOffset;
// Clamp the final position of the rocket to an allowable region
rocketModel.position.x = clamp(rocketModel.position.x, -20, 25);
16、在场景中移动对象
正如我们已经讨论过的,火箭飞船在我们的场景中保持静止,并且物体朝它移动。这些物体移动的速度随着用户继续玩而逐渐增加,随着时间的推移增加了关卡的难度。
仍然在我们的动画循环中,我们希望逐步将这些对象移向玩家。当对象离开玩家的视野时,我们希望将它们从场景中移除,这样我们就不会占用玩家计算机上不必要的资源。
在我们的渲染循环中,我们可以像这样设置这个功能:
// Can be viewed here
if (sceneConfiguration.rocketMoving) {
    // Detect if the rocket ship has collided with any of the objects within the scene
    detectCollisions();

    // Move the rocks towards the player
    for (let i = 0; i < environmentBits.length; i++) {
        let mesh = environmentBits[i];
        mesh.position.z += sceneConfiguration.speed;
    }

    // Move the challenge rows towards the player
    for (let i = 0; i < challengeRows.length; i++) {
        challengeRows[i].rowParent.position.z += sceneConfiguration.speed;
        // challengeRows[i].rowObjects.forEach(x => {
        //     x.position.z += speed;
        // })
    }

    // If the furtherest rock is less than a certain distance, create a new one on the horizon
    if ((!environmentBits.length || environmentBits[0].position.z > -1300) && !sceneConfiguration.levelOver) {
        addBackgroundBit(sceneConfiguration.backgroundBitCount++, true);
    }

    // If the furtherest challenge row is less than a certain distance, create a new one on the horizon
    if ((!challengeRows.length || challengeRows[0].rowParent.position.z > -1300) && !sceneConfiguration.levelOver) {
        addChallengeRow(sceneConfiguration.challengeRowCount++, true);
    }

    // If the starter bay hasn't already been removed from the scene, move it towards the player
    if (starterBay != null) {
        starterBay.position.z += sceneConfiguration.speed;
    }

    // If the starter bay is outside of the players' field of view, remove it from the scene
    if (starterBay.position.z > 200) {
        scene.remove(starterBay);
    }
我们可以看到有几个函数是这个调用的一部分:
detectCollisionsaddBackgroundBitaddChallengeRow
让我们探索一下这些函数在我们的游戏中完成了什么。
17、碰撞检测
碰撞检测是我们游戏的重要途径。没有它,我们将不知道我们的火箭飞船是否达到了任何目标,或者它是否撞到了岩石并应该减速。这就是我们想要在游戏中使用碰撞检测的原因。
通常,我们可以使用物理引擎来检测场景中对象之间的碰撞,但是 Three.js 没有包含物理引擎。
不过,这并不是说 Three.js 不存在物理引擎。他们当然可以,但是为了我们的需要,我们不需要添加物理引擎来检查我们的火箭是否击中了另一个物体。
本质上,我们想回答这个问题,“我的火箭模型目前是否与屏幕上的任何其他模型相交?” 我们还需要根据受到的打击以某些方式做出反应。
例如,如果我们的玩家不断将火箭撞到岩石上,我们需要在受到一定程度的伤害后结束关卡。
为了实现这一点,让我们创建一个函数来检查我们的火箭和场景中的对象的交集。根据玩家击中的内容,我们会做出相应的反应。
我们将把这段代码放在我们的game目录中的一个collisionDetection.ts文件中:
// Can be viewed here

export const detectCollisions = () => {
    // If the level is over, don't detect collisions
    if (sceneConfiguration.levelOver) return;
    // Using the dimensions of our rocket, create a box that is the width and height of our model
    // This box doesn't appear in the world, it's merely a set of coordinates that describe the box
    // in world space.
    const rocketBox = new Box3().setFromObject(rocketModel);
    // For every challange row that we have on the screen...
    challengeRows.forEach(x => {
        // ...update the global position matrix of the row, and its children.
        x.rowParent.updateMatrixWorld();
        // Next, for each object within each challenge row...
        x.rowParent.children.forEach(y => {
            y.children.forEach(z => {
                // ...create a box that is the width and height of the object
                const box = new Box3().setFromObject(z);
                // Check if the box with the obstacle overlaps (or intersects with) our rocket
                if (box.intersectsBox(rocketBox)) {
                    // If it does, get the center position of that box
                    let destructionPosition = box.getCenter(z.position);
                    // Queue up the destruction animation to play (the boxes flying out from the rocket)
                    playDestructionAnimation(destructionPosition);
                    // Remove the object that has been hit from the parent
                    // This removes the object from the scene
                    y.remove(z);
                    // Now, we check what it was that we hit, whether it was a rock, shield, or crystal
                    if (y.userData.objectType !== undefined) {
                        let type = y.userData.objectType as ObjectType;
                        switch (type) {
                            // If it was a rock...
                            case ObjectType.ROCK:
                                // ...remove one shield from the players' score
                                sceneConfiguration.data.shieldsCollected--;
                                // Update the UI with the new count of shields
                                shieldUiElement.innerText = String(sceneConfiguration.data.shieldsCollected);
                                // If the player has less than 0 shields...
                                if (sceneConfiguration.data.shieldsCollected <= 0) {
                                    // ...add the 'danger' CSS class to make the text red (if it's not already there)
                                    if (!shieldUiElement.classList.contains('danger')) {
                                        shieldUiElement.classList.add('danger');
                                    }
                                } else { //Otherwise, if it's more than 0 shields, remove the danger CSS class
                                    // so the text goes back to being white
                                    shieldUiElement.classList.remove('danger');
                                }

                                // If the ship has sustained too much damage, and has less than -5 shields...
                                if (sceneConfiguration.data.shieldsCollected <= -5) {
                                    // ...end the scene
                                    endLevel(true);
                                }
                                break;
                            // If it's a crystal...
                            case ObjectType.CRYSTAL:
                                // Update the UI with the new count of crystals, and increment the count of
                                // currently collected crystals
                                crystalUiElement.innerText = String(++sceneConfiguration.data.crystalsCollected);
                                break;
                            // If it's a shield...
                            case ObjectType.SHIELD_ITEM:
                                // Update the UI with the new count of shields, and increment the count of
                                // currently collected shields
                                shieldUiElement.innerText = String(++sceneConfiguration.data.shieldsCollected);
                                break;
                        }
                    }
                }
            });
        })
    });
}
对于碰撞检测,我们唯一需要做的另一件事是添加一个短动画,当用户与对象碰撞时播放该动画。此函数将获取发生碰撞的位置并从该原点生成一些框。
完成的结果将如下所示。
为了实现这一点,我们必须在碰撞发生的地方创建一个圆圈中的盒子,并将它们向外设置动画,这样看起来它们就像从碰撞中爆炸一样。为此,让我们在collisionDetection.ts文件中添加此功能:
// Can be viewed here
const playDestructionAnimation = (spawnPosition: Vector3) => {

    // Create six boxes
    for (let i = 0; i < 6; i++) {
        // Our destruction 'bits' will be black, but have some transparency to them
        let destructionBit = new Mesh(new BoxGeometry(1, 1, 1), new MeshBasicMaterial({
            color: 'black',
            transparent: true,
            opacity: 0.4
        }));

        // Each destruction bit object within the scene will have a 'lifetime' property associated to it
        // This property is incremented every time a frame is drawn to the screen
        // Within our animate loop, we check if this is more than 500, and if it is, we remove the object
        destructionBit.userData.lifetime = 0;
        // Set the spawn position of the box
        destructionBit.position.set(spawnPosition.x, spawnPosition.y, spawnPosition.z);
        // Create an animation mixer for the object
        destructionBit.userData.mixer = new AnimationMixer(destructionBit);

        // Spawn the objects in a circle around the rocket
        let degrees = i / 45;

        // Work out where on the circle we should spawn this specific destruction bit
        let spawnX = Math.cos(radToDeg(degrees)) * 15;
        let spawnY = Math.sin(radToDeg(degrees)) * 15;

        // Create a VectorKeyFrameTrack that will animate this box from its starting position to the final
        // 'outward' position (so it looks like the boxes are exploding from the ship)
        let track = new VectorKeyframeTrack('.position', [0, 0.3], [
            rocketModel.position.x, // x 1
            rocketModel.position.y, // y 1
            rocketModel.position.z, // z 1
            rocketModel.position.x + spawnX, // x 2
            rocketModel.position.y, // y 2
            rocketModel.position.z + spawnY, // z 2
        ]);

        // Create an animation clip with our VectorKeyFrameTrack
        const animationClip = new AnimationClip('animateIn', 10, [track]);
        const animationAction = destructionBit.userData.mixer.clipAction(animationClip);

        // Only play the animation once
        animationAction.setLoop(LoopOnce, 1);

        // When complete, leave the objects in their final position (don't reset them to the starting position)
        animationAction.clampWhenFinished = true;
        // Play the animation
        animationAction.play();
        // Associate a Clock to the destruction bit. We use this within the render loop so ThreeJS knows how far
        // to move this object for this frame
        destructionBit.userData.clock = new Clock();
        // Add the destruction bit to the scene
        scene.add(destructionBit);

        // Add the destruction bit to an array, to keep track of them
        destructionBits.push(destructionBit);
    }
这就是我们整理出来的碰撞检测,当物体被破坏时会有一个漂亮的动画。
18、添加背景悬崖
随着场景的进行,我们希望在玩家的两侧添加一些悬崖,这样感觉就像他们的运动在某个空间内得到了适当的限制。我们使用模运算符在程序上将岩石添加到用户的右侧或左侧:
// Can be viewed here
export const addBackgroundBit = (count: number, horizonSpawn: boolean = false) => {
    // If we're spawning on the horizon, always spawn at a position far away from the player
    // Otherwise, place the rocks at certain intervals into the distance-
    let zOffset = (horizonSpawn ? -1400 : -(60 * count));
    // Create a copy of our original rock model
    let thisRock = cliffsModel.clone();
    // Set the scale appropriately for the scene
    thisRock.scale.set(0.02, 0.02, 0.02);
    // If the row that we're adding is divisble by two, place the rock to the left of the user
    // otherwise, place it to the right of the user.
    thisRock.position.set(count % 2 == 0 ? 60 - Math.random() : -60 - Math.random(), 0, zOffset);
    // Rotate the rock to a better angle
    thisRock.rotation.set(MathUtils.degToRad(-90), 0, Math.random());
    // Finally, add the rock to the scene
    scene.add(thisRock);
    // Add the rock to the beginning of the environmentBits array to keep track of them (so we can clean up later)
    environmentBits.unshift(thisRock);// add to beginning of array
}
19、添加挑战序列
随着场景的进行,我们还希望将“挑战行”添加到场景中。这些是包含岩石、水晶或盾牌物品的物体。每次创建这些新行中的一个时,我们都会为每一行随机分配岩石、水晶和盾牌。
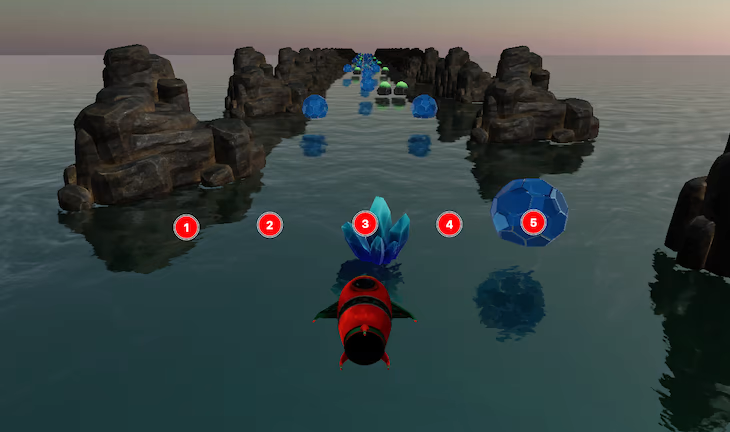
因此,在上面的示例中,单元格 1、2 和 4 没有添加任何内容,而单元格 3 和 5 分别添加了水晶和盾牌项目。
为了实现这一点,我们将这些挑战行分为五个不同的单元格。我们根据随机函数的输出在每个单元格中生成某个项目,如下所示:
// Can be viewed here
export const addChallengeRow = (count: number, horizonSpawn: boolean = false) => {
    // Work out how far away this challenge row should be
    let zOffset = (horizonSpawn ? -1400 : -(count * 60));
    // Create a Group for the objects. This will be the parent for these objects.
    let rowGroup = new Group();
    rowGroup.position.z = zOffset;
    for (let i = 0; i < 5; i++) {
        // Calculate a random number between 1 and 10
        const random = Math.random() * 10;
        // If it's less than 2, create a crystal
        if (random < 2) {
            let crystal = addCrystal(i);
            rowGroup.add(crystal);
        }
        // If it's less than 4, spawn a rock
        else if (random < 4) {
            let rock = addRock(i);
            rowGroup.add(rock);
        }
       // but if it's more than 9, spawn a shield
        else if (random > 9) {
            let shield = addShield(i);
            rowGroup.add(shield);
        }
    }
    // Add the row to the challengeRows array to keep track of it, and so we can clean them up later
    challengeRows.unshift({rowParent: rowGroup, index: sceneConfiguration.challengeRowCount++});
    // Finally add the row to the scene
    scene.add(rowGroup);
}
可以在这些链接中的任何一个查看岩石、水晶和盾牌创建功能。
20、处理渲染循环
我们需要在渲染循环中完成的最后一件事是:
- 将收集到的物体上的碎片移向船
- 如果用户完成关卡,则显示“飞走”动画和关卡摘要
- 如果火箭正在“飞走”,请调整相机以观察火箭,以便用户可以看到它飞向母舰
在我们的渲染函数结束时,我们可以添加以下代码来适应这个功能:
// Can be viewed here

// Call the function to relocate the current bits on the screen and move them towards the rocket
// so it looks like the rocket is collecting them
moveCollectedBits();
// If the rockets progress equals the length of the course...
if (sceneConfiguration.courseProgress >= sceneConfiguration.courseLength) {
    // ...check that we haven't already started the level-end process
    if (!rocketModel.userData.flyingAway) {
        // ...and end the level
        endLevel(false);
    }
}
// If the level end-scene is playing...
if (rocketModel.userData.flyingAway) {
    // Rotate the camera to look at the rocket on it's return journey to the mothership
    camera.lookAt(rocketModel.position);
}
这就是我们的渲染循环完成了。
21、创建游戏用户界面
当人们加载我们的游戏时,他们会看到一些让他们能够开始玩的按钮。
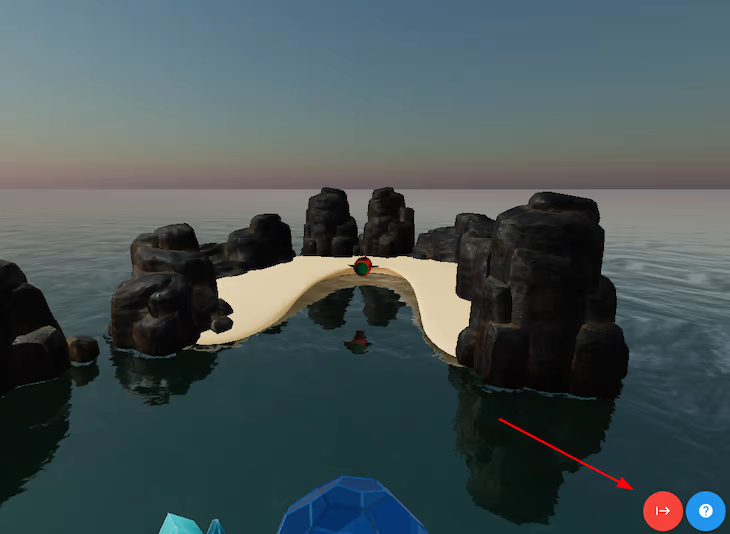
这些只是简单的 HTML 元素,我们根据游戏中发生的情况以编程方式显示或隐藏它们。问题图标让玩家对游戏的内容有所了解,并包含有关如何玩游戏的说明。它还包括我们模型的(非常重要的!)许可证。
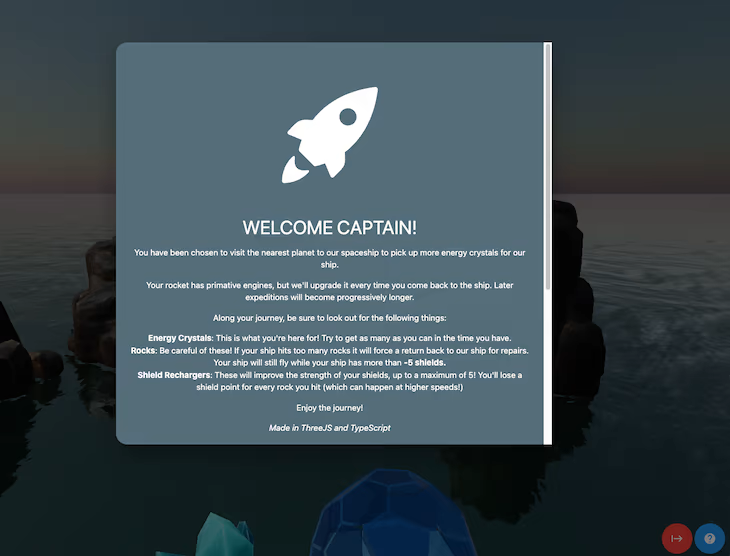
并且,按下红色按钮开始游戏。请注意,当我们点击红色的“播放”按钮时,摄像机会移动并旋转到火箭后面,让玩家准备好开始场景。
在我们的场景init函数中,我们将要执行此操作的事件注册到此按钮的onClick处理程序。要创建旋转和移动功能,我们需要执行以下操作:
- 获取相机的当前位置和旋转
- 获取我们希望相机所在位置的未来位置和旋转
- 创建一个
KeyframeTrack来管理两个游戏位置的移动和旋转 - 将这些轨道分配给混音器并开始播放
为此,我们将在init函数中添加以下代码,如下所示:
// Can be viewed here

startGameButton.onclick = (event) => {
    // Indicate that the animation from the camera starting position to the rocket location is running
    sceneConfiguration.cameraStartAnimationPlaying = true;
    // Remove the red text on the shield item, if it existed from the last level
    shieldUiElement.classList.remove('danger');
    // Show the heads up display (that shows crystals collected, etc)
    document.getElementById('headsUpDisplay')!.classList.remove('hidden');

    // Create an animation mixer on the rocket model
    camera.userData.mixer = new AnimationMixer(camera);
    // Create an animation from the cameras' current position to behind the rocket
    let track = new VectorKeyframeTrack('.position', [0, 2], [
        camera.position.x, // x 1
        camera.position.y, // y 1
        camera.position.z, // z 1
        0, // x 2
        30, // y 2
        100, // z 2
    ], InterpolateSmooth);

    // Create a Quaternion rotation for the "forwards" position on the camera
    let identityRotation = new Quaternion().setFromAxisAngle(new Vector3(-1, 0, 0), .3);

    // Create an animation clip that begins with the cameras' current rotation, and ends on the camera being
    // rotated towards the game space
    let rotationClip = new QuaternionKeyframeTrack('.quaternion', [0, 2], [
        camera.quaternion.x, camera.quaternion.y, camera.quaternion.z, camera.quaternion.w,
        identityRotation.x, identityRotation.y, identityRotation.z, identityRotation.w
    ]);

    // Associate both KeyFrameTracks to an AnimationClip, so they both play at the same time
    const animationClip = new AnimationClip('animateIn', 4, [track, rotationClip]);
    const animationAction = camera.userData.mixer.clipAction(animationClip);
    animationAction.setLoop(LoopOnce, 1);
    animationAction.clampWhenFinished = true;

    camera.userData.clock = new Clock();
    camera.userData.mixer.addEventListener('finished', function () {
        // Make sure the camera is facing in the right direction
        camera.lookAt(new Vector3(0, -500, -1400));
        // Indicate that the rocket has begun moving
        sceneConfiguration.rocketMoving = true;
    });

    // Play the animation
    camera.userData.mixer.clipAction(animationClip).play();
    // Remove the "start panel" (containing the play buttons) from view
    startPanel.classList.add('hidden');
}当我们的关卡结束时,我们还必须连接我们的逻辑,并且可以在此处查看执行此操作的代码。
22、结束语
在 Three.js 中创建游戏可以让你接触到数量惊人的潜在客户。由于人们可以在浏览器中玩游戏而无需下载或安装到他们的设备上,因此它成为开发和分发游戏的一种非常有吸引力的方式。
正如我们所见,为广泛的用户创造一种引人入胜且有趣的体验是非常有可能的。所以,唯一需要解决的是,你将在 Three.js 中创建什么?
原文链接:Creating a game in Three.js
BimAnt翻译整理,转载请标明出处